Photos for social media
CHEAT SHEET
- Start with the best images you can
- Use sRGB
- Use the exact display dimensions
- Only Sharpen AFTER re-sizing the image
- Save the final image at 72dpi and 8/12 image quality
Social media is everywhere and is a fantastic way to showcase your photographic work, build an audience and expand your network. Even if you are not into photography, it is important that your social media page looks the best it can to engage your audience! However, what is the best settings/size/way to get your images to look the best they can on your social media site?
Unfortunately, there is not a single answer, as each site is different, but here are some general tips and tools that will help you improve the presentation of your images. If you have any other suggestions, or if you found this useful, please let me know in the comments section at the end!
1) Use the best camera you have and have the best images you can

This is simple, start with the best, so if you have a good camera/DSLR learn how to use it. I know camera phones are really good these days, but strive for great! for help how to get the best out of your camera, you can look at other "Quick-tips" here on my blog, or if you need some specific help, leave a comment and I will answer you asap! :)
The rest of these tips are based around the fact that you are using your camera, putting the images on your computer and up-loading them to your social media sites or webpage.
2) Use the correct colour space (sRGB)
Different color spaces encompass more or less colours. sRGB being one of the smallest is used for the internet, ProPhoto, having one of the biggest is best for printing! :) Image taken from here!
In order to make this easy to digest it is heavily simplified. Colour space is a fancy way of saying "how many colours can be displayed". The basics of it is, every screen and printer has it's own colour space, depending on how good it is. So to make sure red looks like red on any computer, internet browsers use a colour space that every half-way decent display can, well, display. This is called sRGB, and despite being a small colour space, 99.9% people couldn't tell the difference. If you upload a different color space image, your browser will take the information and convert it to sRGB, and in doing so, can screw up your colours, making red look more like brown etc... so, to keep your images looking great on all devices, make sure you JPGs are sRGB.
Ideally, you are shooting you images in RAW (if you don't know what this is, well, that is a whole other kettle of fish), and when processing them, make sure you export them in sRGB. However, if you get JPG images right out of the camera, make sure it is set to sRGB in the camera. Read you manual/google how to do that for your specific camera. Also, please look into shooting RAW if you really want to improve your photography, I'd be happy to help, just leave a comment at the end.
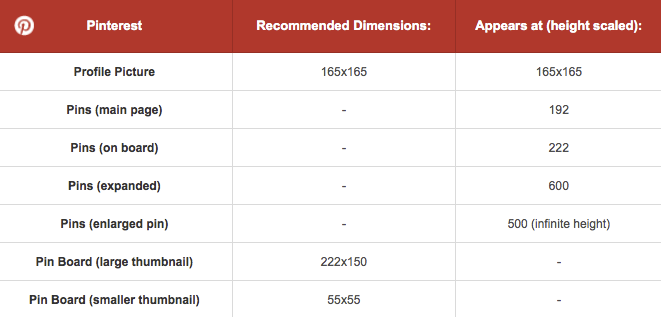
3) Use the right size!
Most of the time, we all upload any size image and let the website do all the re-sizing... but in doing so, you run the risk of the website screwing up your image. I hate the way Facebook makes my images look, have you noticed this too? So i suggest you upload your images at the right size! Here is the size restraints for most social media sources. I got it from SproutSocial.com who have a great up-to-date resource for what sizes of images different sites use. In particular their googledoc is a FANTASTIC resource! If you are not too comfortable using photo editing tools, or find it cumbersome, check out Canva, it is a rather comprehensive tool of photo templates, including social media! NO excuse! :P


3.5) What size for your website?
This is a different question, but an important one. If you are uploading images for your website, you are trying to balance quality with loading speed. I recommend 2500x2500 maximum. I want to show off my images at their best, so want a high resolution, and not many people have displays with a higher resolution than that! However, if you are using an image for a very specific part of your site (a banner or header), i up-load the image at the exact resolution I want.
4) Only Sharpen Images AFTER re-sizing them!
Ideally you are shooting RAW and will post-process your images to make them top-notch, but even with JPGs some post-processing is done to get them as great as possible. I'm not going to go into this too much, as it is a huge subject in itself, but the ONLY thing that needs to be mentioned is regarding "sharpening". Often people "sharpen" their images, myself included, all is well and good. However it is important to ONLY sharpen the image AFTER you have made it the size you want!
5) Reduce the size
With literally millions of people uploading thousands of images to social media, the servers have huge storage capacity. That being said, they don't like to waste it, so will try to make you images as small as possible in terms of MBs. This screws up your images (Facebook being a particular arse). So, make sure your images are already small in size. When you save as a JPG, you get to choose the quality, usually out of 12 (oddly), choose ~8. At with the size of the images you are using, it is more than sharp enough... don't believe me... my images on this website are that "quality" and I am happy with them. It reduces the size which means quicker loads, important for your webpage in particular.
Ooops - I almost forgot, remember you don't need 300 dpi images for the web, 72 dpi is more than enough!
BONUS TIPS

Skip the computer!
If you are a run-and-gun social media photo guru, you can still use your digital camera to get better images without having the additional step of the computer! Get images straight from your camera to your mobile device using an Eyefi card. MobiPro is fantastic... You take a pic with your DSLR, and it is sent directly to your mobile device, ready for some quick Instagram action! :)
Don't use a water mark!
It distracts form your images, can be removed easily if you know how, and if you are really worried about people stealing you images, don't put them up on the internet.